LiveView#
The LiveView feature enables seeing the camera’s sensor output in almost real-time. This output is automatically scaled down and converted into RGB (Debayered) by the camera.
Note
The LiveView feature is supported by IQ4 and iXM cameras. Currently, there is no LiveView support built into P5.
LiveView is received as a series of still images, like frames in a movie. The camera supplies as many frames as the network or USB connection allows, which means the frame rate is variable.
As image frames arrive on the CameraSDK side, they are delivered to you as notifications of the type CameraNewLiveViewImage. You must listen for that notification and activate the subscription to begin receiving LiveView image frames.
To begin receiving image frames, you must enable the LiveView subscription as follows:
camera.Subscriptions()->LiveView()->Subscribe();
camera.Subscriptions.LiveView.Subscribe();
This initiates LiveView in the camera and will begin streaming frames to the CameraSDK. Tap into this stream by creating (or re-using an existing) Listener object:
P1::CameraSdk::Listener listener;
listener.EnableNotification(camera, P1::CameraSdk::EventType::CameraNewLiveViewImage);

std::shared_ptr<P1::CameraSdk::INotificationEvent const> notification = listener.WaitForNotification();
if ( ! notification ) return 0; // null check
std::shared_ptr<const P1::CameraSdk::ILiveView> liveView = notification->LiveView();
var listener = new Listener();
listener.EnableNotification(camera, EventType.CameraNewLiveViewImage);
using var notification = listener.WaitForNotification(1000);
using var liveView = notification.LiveView;
The ILiveView object contains, e.g., the width and height of the LiveView frames and information about the format of the LiveView frames.
The LiveView frames are stored in “borrowed” memory from the CameraSDK. Therefore, you must always dispose of the LiveView image object immediately after use.
Warning
Failing to dispose of image objects will cause the internal LiveView receive buffer to run out of memory and cause it to be unable to pass new LiveView frames.
Stop the LiveView feed from the camera when you no longer need it. This significantly reduces the camera’s power consumption and heat generation. Disabling the LiveView feed can be done as follows:
camera.Subscriptions()->LiveView()->Unsubscribe();
camera.Subscriptions.LiveView.Unsubscribe();
Special Notification Behavior#
Given enough transfer bandwidth, the camera can send 60 FPS, which will all arrive in the notification queue. To ease the stress on the queue, LiveView notifications have a special behavior: All incoming CameraNewLiveViewImage will overwrite any existing LiveView image notification already present in the queue - in place!
This means that there can only be one single LiveView notification at any time in a Listener’s queue. This notification will be overwritten whenever another (newer) notification arrives. This ensures you will always get the latest image frame, and your queue will not get flooded with image notifications.
You can still have two separate Listener objects, both listening for LiveView image notifications. Each will have one notification instance in their queue. Both these instances will be overwritten whenever a new notification arrives.
Still, similar to other notifications, only a single image payload instance (LiveView image buffer object) is shared between notifications across all listener queues.
Again, remember that only one LiveView notification can be present on a Listener queue. When new LiveView images arrive, they will overwrite the existing notification in place! Keep this in mind when working with LiveView.
Configuration#
The subscription class for LiveView includes a set of configuration parameters that allow you to tailor how LiveView frames are processed in the camera. Most prominently, the configuration enables you to scale and crop the LiveView output. Both these operations happen in the camera; the CameraSDK does no processing.
Note
Changing these configuration parameters will flush the camera’s processing pipeline. This means there will likely be a brief drop in frame rate, and you might even receive frames with visible artifacts.
Formatting#
By default, all cameras deliver LiveView images in 24-bit RGB (8-8-8) pixels, row first order. This means the image frame is uncompressed, and the buffer is the size of the sum of the 3-byte RGB pixels.
Newer camera firmware supports JPEG-encoded image frames, effectively achieving something similar to Motion JPEG. In this mode, the image buffer contains a valid JPEG file that can be written to disk and read by any image viewer.
Using Jpeg instead of uncompressed 24-bit RGB is much more CPU intensive for the camera, so the maximum frame rate for Jpeg is 12 FPS. The benefit is a much lower bandwidth cost! This is ideal when using LiveView over an (outdoor) Wifi network.
Cameras also have an auto mode that automatically switches between 24-bit RGB and JPEG, selecting the one with the highest frame rate.
Caution
Basic LiveView is available on all cameras. However, the capability to receive image frames as JPEG images was introduced in CameraSDK 3.0. This JPEG feature also requires your camera to run:
iXM: Firmware 4.23 or later
IQ4: Firmware 6.03 or later
You can set your desired format when activating the LiveView subscription, using a custom Subscribe(...) method:
camera.Subscriptions()->LiveView()->Subscribe(P1::CameraSdk::ImageFormat::Auto);
Or, you can use the designated SetFormat method on the subscription object:
camera.Subscriptions()->LiveView()->SetFormat(P1::CameraSdk::ImageFormat::Auto);
Not setting the format will keep the camera’s default setting, which is RGB24.
Caution
When using the Auto format, be aware that the camera might change the format from one incoming frame to the next. Always inspect the format of every frame and avoid making any assumptions about it.
If the frame rate drops, the camera might try to use JPEG. On the other hand, if the JPEG frame rate sits consistently at 12 FPS, the camera might occasionally try switching to uncompressed RGB to see if that can achieve higher than 12 FPS.
Crop#
Using the crop feature, you can ask the camera to send you only a portion of the total image. This allows you to effectively implement zoom and pan in LiveView image streams.
The crop is defined by an offset and a width and height, as illustrated in the figure below:
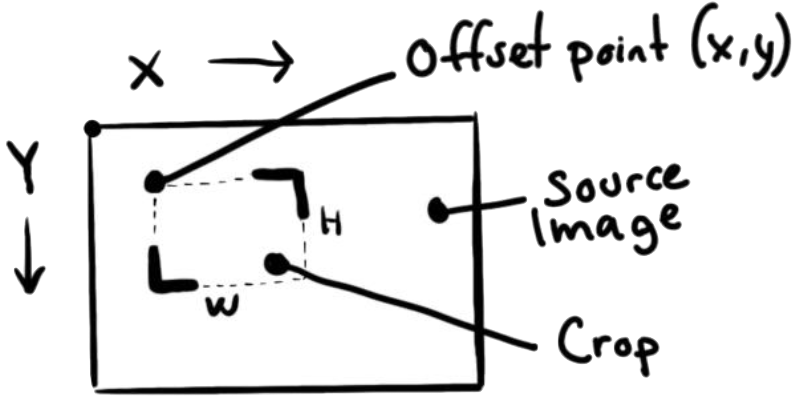
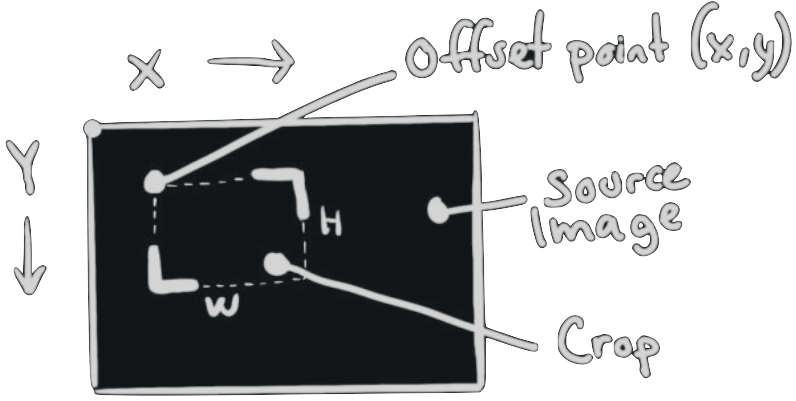
The offset coordinates (X, Y) have an origo in the upper left corner.
Changing the dimension (width and height) will not change the final output size of the LiveView frame. It will change the amount of “downscaling” applied to the image. However, you cannot crop to a dimension (width and height) below the final output size of the LiveView frame.
Set a crop on the LiveView image stream:
P1::CameraSdk::ValueRect aCrop { 100, 100, 2000, 2000 };
camera.Subscriptions()->LiveView()->SetCrop(aCrop);
- ..include-tab:: ../../labels/csEnableLiveViewCustom
- language
csharp
- title
C#
This applies a [ (x: 100, y: 100), (w: 2000, h: 2000) ] crop to the LiveView stream and immediately flush the internal processing pipeline. You may still receive LiveView frames using the previous crop since they may already be in transit to your Host Computer.
Your requested crop is not guaranteed to be obeyed precisely by the camera since the cropping process is done by hardware. The camera will find the nearest crop, supported by the hardware, and use that. This means you will most likely get a crop that is slightly off what you requested. For this reason, the LiveView image buffer class, ILiveView defines two crops:
``SourceCrop()``is the crop you actually got.
``RequestedCrop()``is the crop that you initially requested.
Therefore, make sure you inspect the incoming LiveView frames for the crop that is applied to them, using the SourceCrop() method.
Tip
Use the method ResetCrop() on the ILiveViewSubscription object to return to no crop, meaning you will see the entire sensor frame in the LiveView stream.
Image Output Size#
The camera will scale down every LiveView frame to a fixed output size, whether cropped or not. You can change this size using the Preferred Max Dimension option. This option defines the length (in pixels) of the longest edge of the image. Whether this edge is the width or height will depend on the currently applied crop or, if there is no crop, on the camera sensor’s aspect ratio.