Meta Data System#
Meta Data Extraction#
The ImageSDK can access meta-data from the opened image. This could for example be “GPS coordinates” or “aperture”.
This can be extracted by requesting the specific meta-data. For instance, requesting the “ISO” and writing the output to console, as follows:
P1::ImageSdk::ImageTag iso = image.GetTag(P1::ImageSdk::TagId::IsoSpeedRatings);
std::cout << "ISO " << iso.ToString() << std::endl;
ImageTag iso = image.GetTag(TagId.IsoSpeedRatings);
Console.WriteLine("ISO: {0}", iso);
Output:
ISO: 100
Tags#
The image file contains a number of tags, each containing data about the image or the camera.
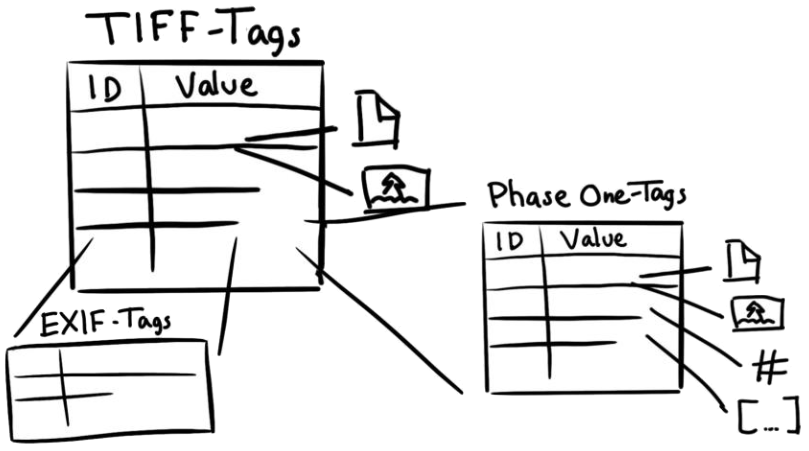
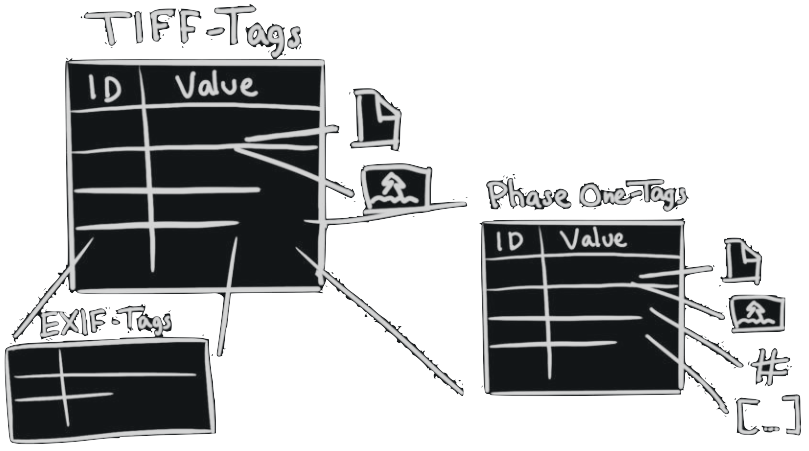
The images contain tags defined by the TIFF-standard (hereunder both TIFF- and EXIF-tags) and tags defined by Phase One (Phase One-tags). The Phase One-tags are proprietary to Phase One cameras and images.

Each tag has an ID and a value (the value can consist of several entries, e.g. a list). When extracting the tag, it is necessary to know the ID of the desired tag. In the ImageSDK, the most common tag-IDs for both TIFF-tags and Phase One-tags are predefined.
An example of tags being extracted can be seen below:
P1::ImageSdk::ImageTag apertureApex = image.GetTag(P1::ImageSdk::TagId::ApertureValue);
std::cout << "Aperture " << apertureApex.ToString() << std::endl;

P1::ImageSdk::ImageTag lensName = image.GetTag(P1::ImageSdk::TagId::LensName);
std::cout << "LensName " << lensName.ToString() << std::endl;
ImageTag apertureApex = image.GetTag(TagId.ApertureValue); //TIFF-tag
Console.WriteLine(" * Aperture: {0}", apertureApex);

ImageTag lensName = image.GetTag(TagId.LensName); //Phase One-tag
Console.WriteLine(" * LensName: {0}", lensName);
Output:
* Aperture: 49709 / 10000
* LensName: Rodenstock RS 90mm-Ar
Caution
Some tags may not be available in certain images, if no value exists for the tag. A tag’s existence can be investigated similarly to the extraction of the tag, by using the image.TagExists
Meta Data Writing#
Note
ImageSDK version 3.1 introduces a new way to handle metadata. In the new system it is possible to both read metadata (like in the existing system), but also to insert your own tags or modify parts of the metadata.
When the ImageSDK is exporting an image into an imagefile, a lot metadata can be inserted automatically. In this case it is not necessary to do anything, but in some cases, there is a wish to insert additional tags. With ImageSDK version 3.1, it is now possible, depending on the type of the exported image and the kind of metadata.
Below is small list of the limitations to what can be done to the metadata - as a rule of thumb the restrictions are:
- It’s possible to inject exif and tiff tags, expect:
if they are used by the SDK to define e.g. image data and format.
that they are supported by the chosen image format.
for tiff files it is required that the tag is supported by the libtiff which is used by the SDK to write tiff files.
- It’s possible to edit and extend the xmp block.
it is possible to inject new namespaces
it is possible to delete, edit in insert new xmp tags if the relevant xmp namespace exist.
Caution
Be aware that changing, removing, or inserting metadata in the exported file, might make the exported file inconsistent - it us up to the user of the ImageSDK to make sure it is done correctly.
How to use the new Meta Data system#
// include the header file
#include "P1ImageCommonMetaData.hpp"

// Open a Raw image
P1::ImageSdk::RawImage image = P1::ImageSdk::RawImage("imagefilename.iiq");

// Create the MetaData
P1::ImageSdk::MetaDataBase metadata(image, true);
RawImage image = new RawImage("imagefilename.iiq");

MetaDataBase metaDb = new MetaDataBase(image);
This will read the metadata from in the IIQ file. The ‘true’ argument (C++ only) means that we want a local copy of the metadata, which is the preferred way to do it (in C# it is always a copy). If it is false (only C++) then we will work directly on an internal copy in the RawImage object, so changes here will stay as long as the RawImage is opened (it will not change the content of the IIQ file itself).
After this we now have a metadatabase object we can use to access metadata.
First we can check if Iso is defined in the exif data:
if (metadata.Exist("exif:0x8827"))
{
    bool error=false;

    // the iso tag was found - now lets read it.
    int isoValue = metadata.GetMetaObject("exif:0x8827").GetUWord(error);
    if (!error)
    {
        // things went good - value can now be used - found in isoValue
    }
}
if (metadata.Exist("exif:0x8827"))
{
    bool error=false;

    // the iso tag was found - now lets read it.
    int isoValue = metadata.GetMetaObject("exif:0x8827").GetUWord(error);
    if (!error)
    {
        // things went good - value can now be used - found in isoValue
    }
}
Lets go through the example:
First it is checked that the iso tag exist in the exif data. The “address” of the tag is composed as a string, by concatenating the name of the block in this case exif, and then the tagnumber.
If it is found it can be read. When it comes to binary tags like: tiff, exif and phaseone tags then we must read it using the correct datatype. The iso tag is defined as an unsigned 16 bit integer (UWord), and can therefore be read with the function: GetUWord. If a wrong access function is used, then the variable ‘error’ will be set to true.
Create a new value in the exif block#
bool success = metadata.CreateMetaObject("exif:0x9401").SetURational({ 9737,10 });
bool success = metadata.CreateMetaObject("exif:0x9401").SetURational({ 9737,10 });
The variable success will be set to true if we are successful. In this case the exif tag for humidity is set to 973.7.
Inserting xmp data:
bool success = metadata.CreateXmpNamespace("mynamespace", "http://www.mydomain.com/mynamespace/");

if(success)
{
    success = metadata.CreateMetaObject("xmp:mynamespace:myusertext").SetString("This is my user string");
    ...
}
bool success = metadata.CreateXmpNamespace("mynamespace", "http://www.mydomain.com/mynamespace/");

if(success)
{
    success = metadata.CreateMetaObject("xmp:mynamespace:myusertext").SetString("This is my user string");
    ...
}
First a new namespace is defined with the name “mynamespace”.
If that was successful, then a new tag called: “myusertext” is added to the just created namespace. If a new tag can also be added to an already existing namespace, in this case creating the namespace is not necessary. The addressing in the xmp block is done in the same ways as in the exif example, with the exception that the address needs also to state the name of the namespace where tag must be inserted:
xmp:<namespace>:<tagname>
Also notice that for the xmp that tags are not numbers but names. Also values of the tags are always text based and must therefore be accessed as strings using GetString/SetString (values are encoded as strings).
Other metadata#
Phase One tags are proprietary tags similar to exif data. Most of them are used to enable the Sdk to read and decode the IIQ file, and is only for internal use by eg. the SDK. Some of the tags can be useful though, below is an example on how to read the sensor temperature when image was captured:
float t = metadata.GetMetaObject("phaseone:0x0257").GetFloat(error);
float t = metadata.GetMetaObject("phaseone:0x0257").GetFloat(error);
The tags are read-only and cannot be set.
Avoid tags from being output or check if they can be modified:
To avoid a tag is written to an exported file, can be done the following way:
metadata.GetMetaObject(address.of.tag).SetWritable(false);
metadata.GetMetaObject(address.of.tag).SetWritable(false);
Also it is possible to test if an existing tag can be modified, using:
bool isModifiable = metadata.GetMetaObject(address.of.tag).IsModifiable();
How to get the metadata into the exported image file#
Even though the metadata is modified does not mean the changes will automatically end in the exported image file. To just use the internal metadata database, then just export the image in the simple way:
P1::ImageSdk::TiffWriter tiffWriter(filename, bitmap, image, config);
_ = image.WriteAsTiff(filename, bitmap, config);
To use a local copy of the metadatabase to be used when exporting the file, the following function can be used for the export:
P1::ImageSdk::TiffWriter tiffWriter(filename, bitmap, image, metadata, config);
_ = image.WriteAsTiff(filename, bitmap, metadata, config);
Source of information about Tiff and Exif tags#
It is without scope of the SDK to contain documentation about tiff and exif tags, since they are standard tags. A good source of documentation about these tags can be found in:
https://exiftool.org/TagNames/EXIF.html
The SDK is using an external library to write tiff files, called libtiff (http://www.libtiff.org/), unfortunately there are some limitations on which tags can be written with this library, to find this information you need to use the available information provided by the library itself.
A good tool for “debugging” the metadata in the exported image file is ExifTool by Phil Harvey (https://exiftool.org/)
Where it is possible to both validate the metadata and also dump the content of the metadata in an image file.
